It’s always an exciting time of year when the tuna come rolling through the New York City area. There’s often steady yellowfin action in and around the canyons, and bluefin tuna 15 to 20 miles offshore heading north. If you’ve ever fought a tuna on a rod and reel, you know what immense power they hold. They are robust, humbling animals that remind you of your place in nature’s ecological pyramid.
I remember the first time I was fortunate enough to take a trip offshore. We departed from Chatham, Massachusetts in the early morning light and steamed out to the mackerel grounds. We filled the livewell with healthy mackerel we jigged, and in no time, we had our bait for the day. I love the principle behind this kind of fishing and its application to other species. Whether it be trout or tuna, find local bait and present it naturally to entice an eat.
Once we had our mackerel ready to drift, we waited until we were thoroughly entrenched in a mass migration of marine life to pitch our baits. Whales and bottlenose dolphins pushed sand eels all around the boat, while giant bluefin tuna traveled underneath, occasionally erupting on mackerel schools. I hadn’t seen a tuna until this trip, and when I looked over the stern into the deep blue, I saw SUV-sized shadows in the water column. Before I knew it, we were met with one of the world’s greatest noises: a screaming drag pull. We landed the bluefin tuna after 45 minutes, and after deeming it a smaller classed fish clocking in at approximately 250 pounds, I could only wonder at the power held by a 1,000-pounder.
This experience fishing for tuna and eating it within 24 hours of landing it reaffirmed my stance that fresh fish truly shines. With that, it’s important to honor that animal’s life and experience in nature, through meaningful preparation in the kitchen.
When fishing for tuna, the species you’ll run into in our Atlantic waters are often bluefin, yellowfin, and bigeye tuna. All of these species are safe to be eaten raw and are regularly low-frequency parasite carriers. While much of the tuna sold around the world is blast frozen for parasite elimination, a fresh fish that is properly iced and cared for should yield the same quality meat.
One of my favorite ways to eat tuna is to keep it rare, highlighting that gorgeous ruby color. When thinking of this article’s recipe, I wanted to create a plate that combines the tuna’s delicate nature with savory texture. The ahi tuna egg roll was born. Crispy on the outside, fragrant and clean interior, all accompanied by a tangy umami sauce.

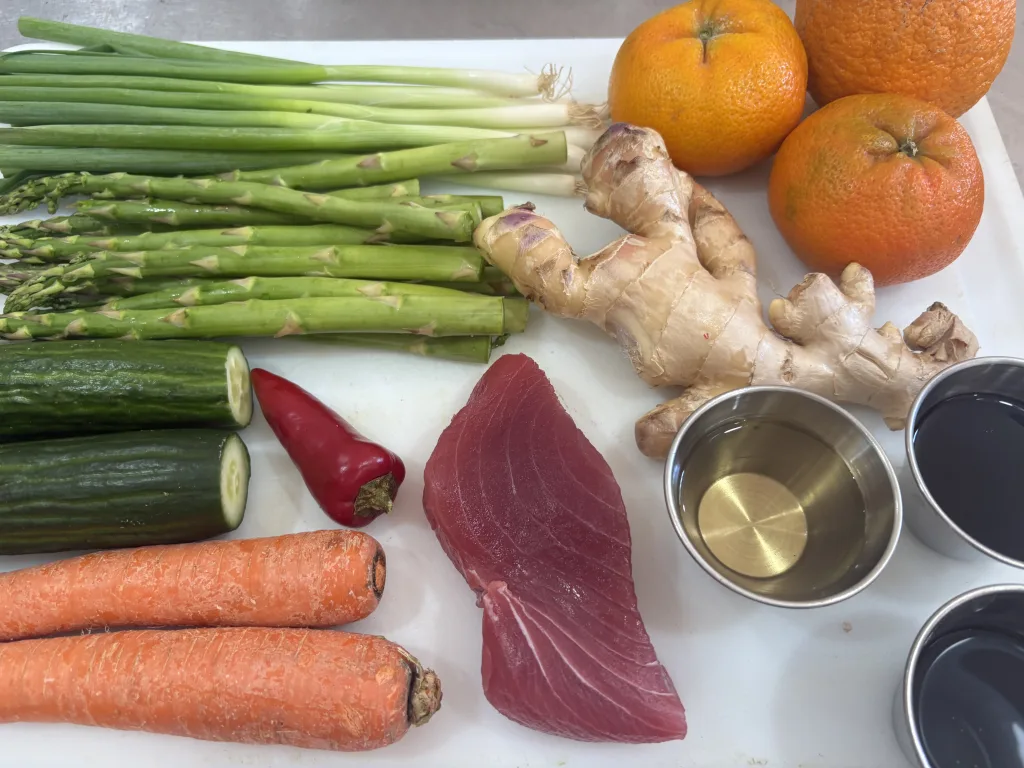
Ingredients for Ahi Tuna Egg Rolls
- Sushi Grade Tuna
- Wonton Wrappers
- Ginger
- Scallion
- Carrot
- Fresno Pepper
- Cucumber
- Asparagus
- Soy Sauce
- Ponzu
- Rice Wine Vinegar
- Cucumber
- Sugar
- Salt
- Frying oil
Step 1: Prep your Ingredients
Julienne scallion, carrot, ginger, and Fresno pepper.
Slice the ahi tuna against the grain into bite-sized pieces. Ensure that the tuna pieces are not longer than the wonton wrappers you are using. This will allow for a proper seal when frying.
Step 2: Assemble the Egg Rolls

Lay the tuna diagonally on your wonton wrapper. Add carrot, ginger, scallion, and Fresno pepper to each wonton, tucking them just next to the tuna.
Brush all four edges with egg wash (lightly cut with water).
Bring the nearest diagonal corners together, and finish rolling forward. Roll tightly, pressing out any air.
Keep chilled to hold shape.
Step 3: Fry
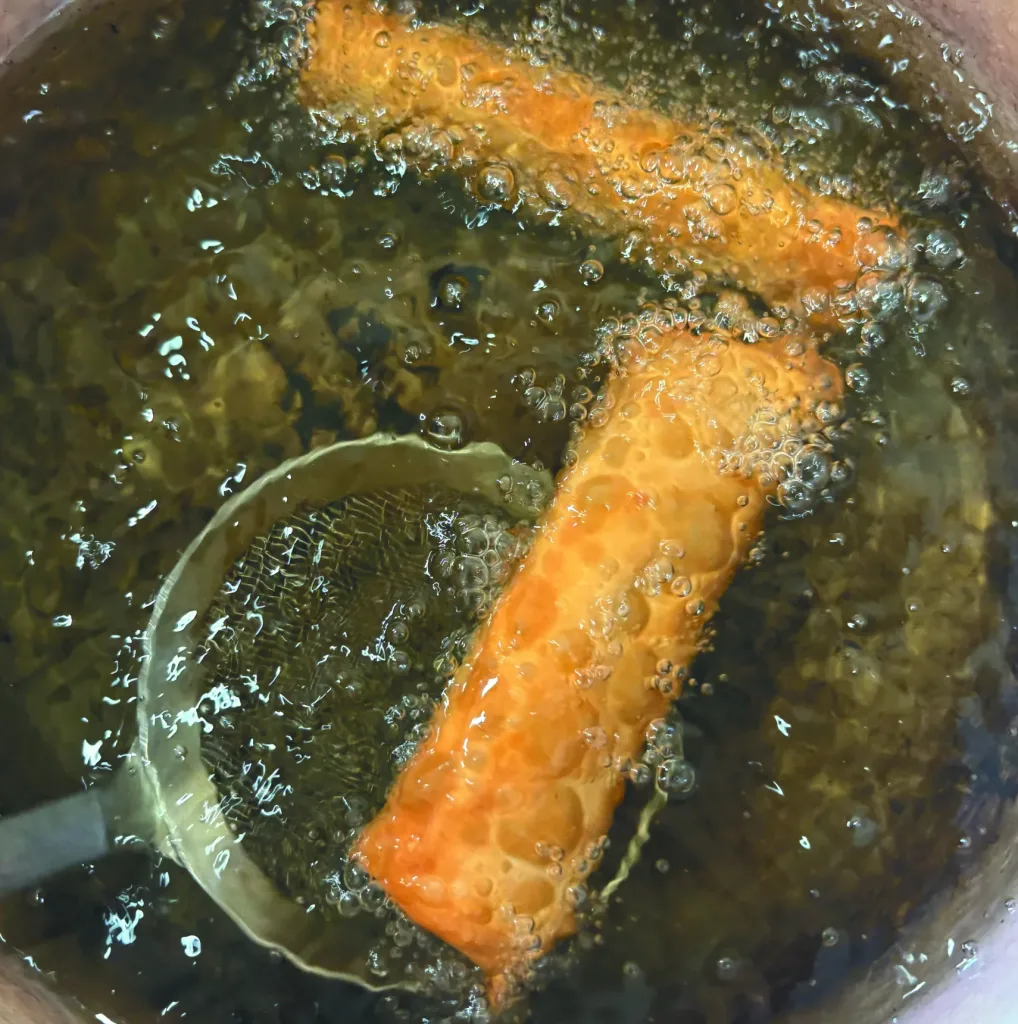
When ready to fry, heat a high-smoke-point oil to 375 degrees Fahrenheit. Fry each egg roll for less than a minute; this is imperative in maintaining a rare cross-section when eating. The chilled egg rolls will slightly drop the temperature of the oil when they’re dropped in (in turn keeping the tuna perfectly rare). Don’t overcrowd your pot.
Step 4: Make the Sauce
Every good egg roll needs a bomb dipping sauce.
Combine equal parts soy sauce, rice wine vinegar, and ponzu.
Add another cup of fresh mandarin juice, or any citrus of your choice.
Season with salt and sugar to taste, and then reduce.
This reduction should go for 15-20 minutes at a medium heat, or until the sauce coats the back of a spoon.
Step 5: Cook the Asparagus

At this time of year, we are seeing some of the season’s most vibrant asparagus. Similar to what I catch, I always love to get the most out of an ingredient by letting it shine in the cooking process. This method doubles down.
Don’t blanch your asparagus, place them into a ripping hot cast iron with olive oil and a touch of sea salt. Let them go on high heat, and cover to cook in their own juices.
After 7 minutes, you should have beautifully tender and charred asparagus, still holding a slight snap.
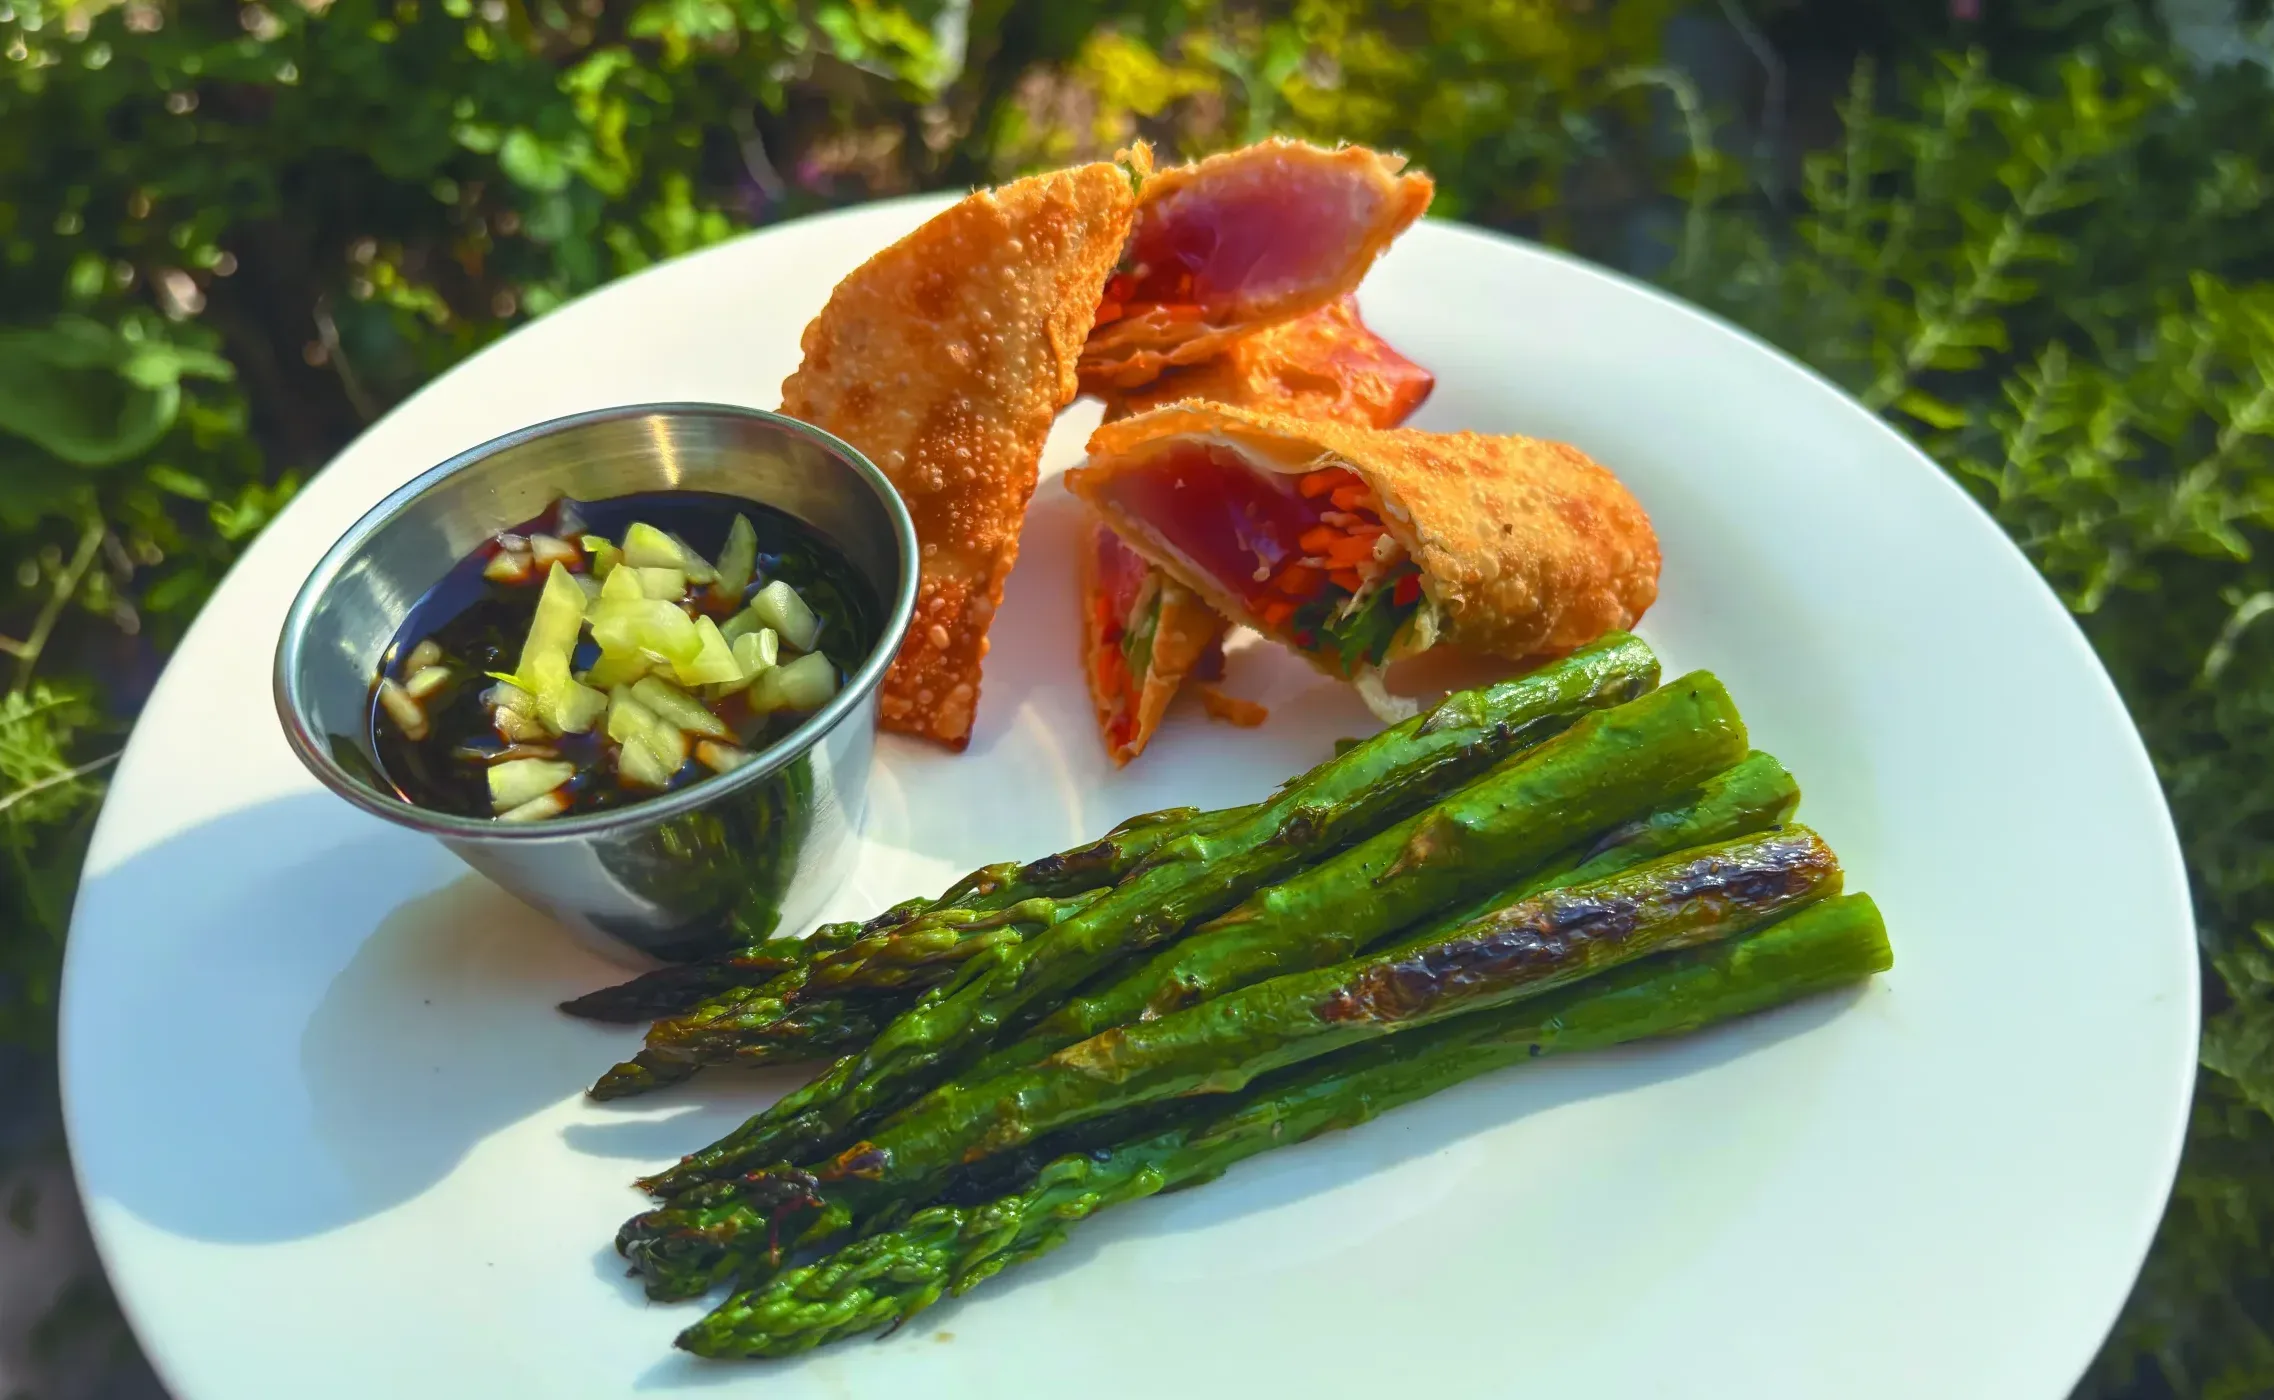
Step 6: Plate & Enjoy

The fun part! Serve egg rolls with a cup of sauce topped with minced cucumber, alongside the charred asparagus.
Enjoy your creation, slow down, and start lining up the next trip. Tight lines and happy eating.
READ MORE